Table of Contents
Photosynthesis
Photosynthesis is the process plants use to convert light energy into chemical energy. They take in carbon dioxide (CO₂) and water (H₂O), and using light and chlorophyll, produce glucose (C₆H₁₂O₆) and oxygen (O₂).
Why Use Hydrilla for Photosynthesis Experiments?
Hydrilla is an aquatic plant often used in photosynthesis experiments because it’s easy to work with and its photosynthetic activity is easy to observe through the production of oxygen bubbles.
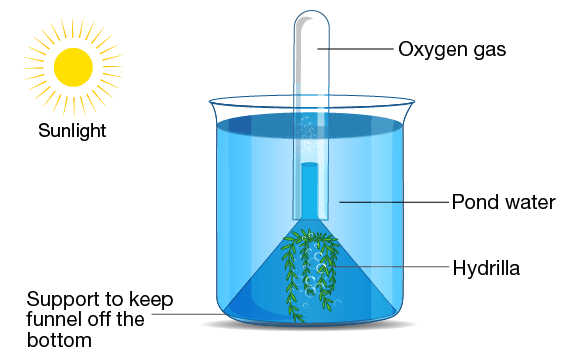
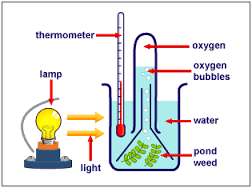
The Experiment Setup
Materials Required
- Hydrilla Plant- A freshwater aquatic plant used because it readily produces visible oxygen bubbles during photosynthesis.
- Beaker with Water- Provides an aquatic environment for the Hydrilla. The size of the beaker depends on the size of the Hydrilla spring but should be large enough to fully submerge the plant.
- Sodium Bicarbonate (Baking Soda)- Serves as a source of carbon dioxide (CO₂) when dissolved in water, which is a necessary reactant for photosynthesis.
- Funnel- Placed over the Hydrilla to direct oxygen bubbles into the test tube. The funnel’s stem should be long enough to reach into the neck of the test tube.
- Test Tube- Captures the oxygen bubbles produced by the Hydrilla. It should be filled with water and inverted over the funnel stem without letting air in.
- Light Source- Can be natural sunlight or an artificial light source like a lamp. This provides the energy needed for the Hydrilla to perform photosynthesis.
Procedure
- Preparing the Beaker-
- Fill the beaker with enough water to fully submerge the Hydrilla plant. The water acts as the medium in which the plant can perform photosynthesis.
- Adding Sodium Bicarbonate-
- Dissolve a small amount of sodium bicarbonate in the water. This step increases the CO₂ concentration in the water, which is crucial for photosynthesis. The sodium bicarbonate reacts with water to form bicarbonate ions, which the plant can use as a source of CO₂.
- Placing the Hydrilla-
- Insert the Hydrilla plant into the beaker, ensuring it’s completely submerged. The plant should be positioned so that it’s under the funnel when it’s placed in the next step.
- Setting Up the Funnel and Test Tube-
- Invert the funnel over the part of the Hydrilla where you expect to see the most bubbles (typically near the tips of the plant). Make sure the funnel is fully submerged, with its tip pointing upwards.
- Fill the test tube completely with water from the beaker, covering the open end with your thumb to keep the water in as you invert it.
- Carefully place the inverted test tube over the stem of the funnel. The water in the test tube prevents air from entering, creating a sealed environment where the only gas that can fill the tube is oxygen produced by the plant.
- Exposing to Light-
- Position the light source close enough to provide ample light but not so close that it overheats the water or the plant. If using sunlight, place the setup in a well-lit area.
Purpose of Each Steps of Experiment Explained
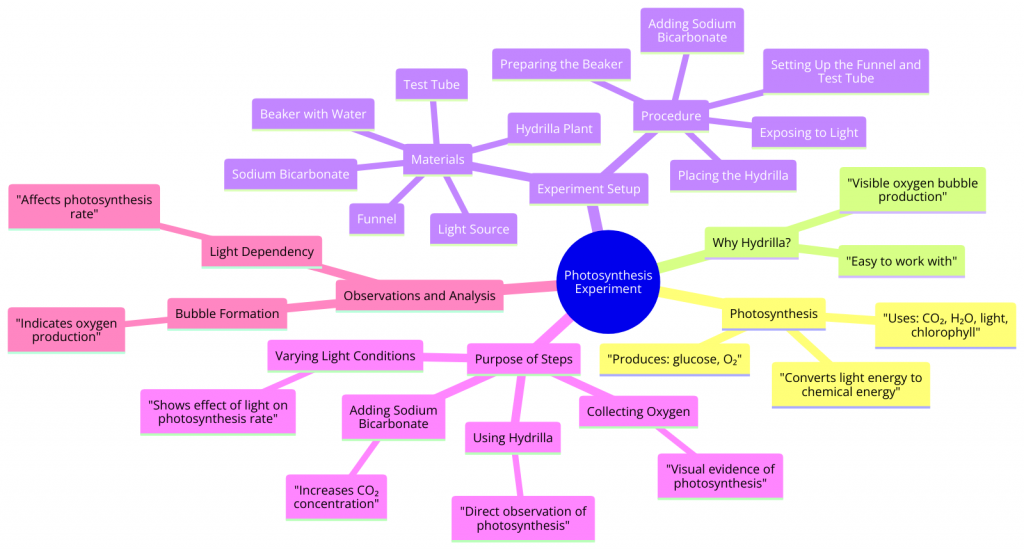
Using Hydrilla-
- Concept- Photosynthesis is a process where plants convert light energy into chemical energy, producing glucose and oxygen from carbon dioxide and water.
- Purpose- By using a real plant like Hydrilla, you can directly observe this process. Hydrilla is chosen because it readily releases visible oxygen bubbles during photosynthesis, making it easier to see the process in action.
Adding Sodium Bicarbonate-
- Concept- Carbon dioxide (CO₂) is a raw material for photosynthesis. The more CO₂ available, the faster the rate of photosynthesis, up to a point.
- Purpose- Adding sodium bicarbonate the water dissolves into CO₂, increasing its concentration around the Hydrilla. This demonstrates how increasing CO₂ levels can speed up photosynthesis, which is essential for understanding how environmental factors affect plant growth.
Collecting Oxygen in the Test Tube-
- Concept- Oxygen is a byproduct of photosynthesis, released when water molecules are split to obtain electrons for the light-dependent reactions.
- Purpose- The test tube collects the oxygen bubbles produced by the Hydrilla. This serves as direct, visual evidence that photosynthesis is occurring. It also allows for the measurement of oxygen production, which can be used to quantify the rate of photosynthesis under different conditions.
Varying Light Conditions-
- Concept- Light provides the energy needed for photosynthesis. The light-dependent reactions convert light energy into chemical energy, which is then used to synthesise glucose in the light-independent reactions.
- Purpose- Changing the light intensity or distance from the light source to the Hydrilla demonstrates how light affects the rate of photosynthesis. This illustrates the concept that without sufficient light, photosynthesis can slow down or stop, emphasising the importance of light in this process.
Hydrilla Plant Experiment Diagram
Observations and Analysis
Bubble Formation
What We See
During the experiment, you’ll notice small bubbles emerging from the Hydrilla leaves and ascending to the water’s surface. These bubbles then collect in the inverted test tube placed over the funnel.
Why It Matters
- Oxygen Production- The bubbles are made of oxygen, which is released by the Hydrilla as it undergoes photosynthesis. This oxygen is a byproduct of the process of splitting water molecules, which is part of the light-dependent reactions of photosynthesis.
- Measuring Photosynthesis Rate- By counting the number of bubbles over a specific period (like a minute), we can gauge the rate at which photosynthesis is happening. A higher bubble count in a set time frame suggests a more rapid photosynthesis process. This method provides a straightforward way to quantify the photosynthesis rate and compare it under different conditions.
Light Dependency
What We See
The number of oxygen bubbles produced by the Hydrilla changes when we alter the light conditions -either by adjusting the light’s brightness or by changing the distance between the light source and the plant.
Why It Matters
- Light’s Role- Light is crucial for the light-dependent reactions in photosynthesis. These reactions use light energy to generate ATP and NADPH, which are essential energy carriers. They provide the necessary energy and reducing power for the Calvin cycle, where glucose is synthesised.
- Effect of Light Intensity- Increasing the light intensity (making the light brighter or moving the light source closer) generally leads to more oxygen bubbles being produced. This indicates an increased rate of photosynthesis due to more energy being available for the light-dependent reactions.
- Limitations- However, there’s a threshold to this effect. After a certain point, even if we increase the light intensity, the rate of photosynthesis doesn’t continue to rise. This plateau occurs because other factors become limiting, such as the availability of CO₂, water, or the plant’s inherent capacity to process the inputs. Beyond the optimal light intensity, factors like enzyme saturation, leaf temperature, or insufficient reactants (CO₂ and water) might restrict further increases in the photosynthesis rate.
Also Check – Experimental study on growth of Hydrilla
Also Check – Name the factors affecting Photosynthesis
Also Check – What are the Adaptations of leaf for Photosynthesis
Also Check- 13 Important Differences between Photosynthesis and Respiration
Also Check – Where do Plants get each of the Raw Materials required for Photosynthesis
I was researching about online today and came across your website – a great collection of high-quality articles.