A convex lens, often referred to as a converging lens, is a vital optical component with unique characteristics. These lenses are thicker in the centre and thinner at the edges, resembling the shape of a sphere on both sides. Their primary function is to converge or bring together light rays, thereby forming a focused image. This unique property makes convex lenses a crucial component in various optical devices like eyeglasses, magnifying glasses, telescopes, and microscopes.
Table of Contents
What is a Convex Lens?
In optical terms, a convex lens is typically composed of two spherical surfaces bulging outwards. It has a thicker centre compared to its edges, which are relatively thinner. Depending on the object’s position, a convex lens can form both real and virtual images. When the image is virtual, it is always erect and smaller than the object.
Also Check – Convex Lenses- Principles, Applications, and Insights
Convex Lens Ray Diagrams
A convex lens, due to its shape, refracts (bends) light rays in a specific manner, leading to the formation of images at various locations based on where the object is placed relative to the lens.
1. Object at Infinity
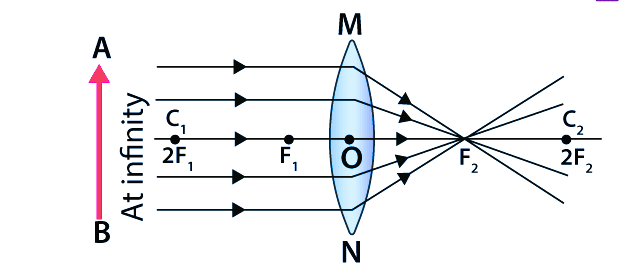
- Scenario- The object is placed very far from the lens, practically at an infinite distance.
- Ray Behavior- Parallel rays coming from the object converge at the lens’s focal point after refraction.
- Image Formation- The image is a real image, meaning it can be projected on a screen. It’s highly diminished (very small), practically a point-sized image, and formed at the focal point of the lens.
Also Check – Refraction of Light- A Comprehensive Guide for Students
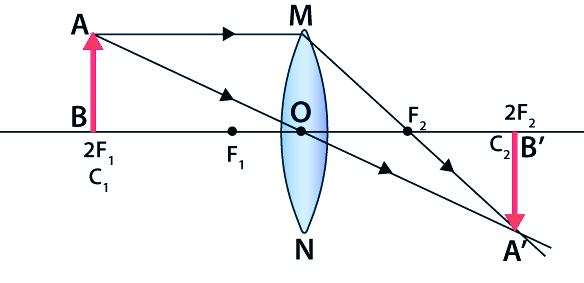
2. Object Beyond Center of Curvature
- Scenario- The object is placed beyond the lens’s centre of curvature (more than two focal lengths from the lens).
- Ray Behavior- Rays coming from the object are refracted by the lens and converge to form an image.
- Image Formation- The image is real and inverted. It is formed between the focal point and the centre of curvature of the lens. The size of the image is diminished compared to the object.

3. Object at Center of Curvature
- Scenario- The object is placed at the centre of curvature of the lens (exactly two focal lengths away).
- Ray Behavior- The rays coming from the object are refracted and meet at the centre of curvature on the other side of the lens.
- Image Formation- The image is real, inverted, and of the same size as the object. It forms at the centre of curvature on the opposite side of the lens.
4. Object Between Center of Curvature and Focus
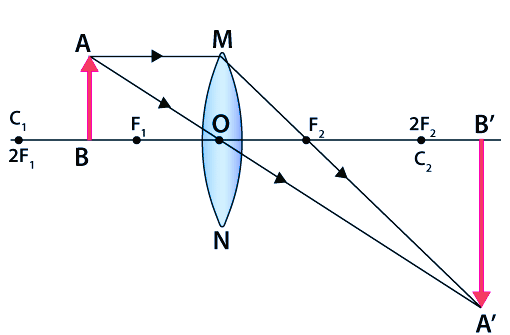
- Scenario- The object is between the centre of curvature and the focal point of the lens.
- Ray Behavior- The rays refract and converge at a point behind the centre of curvature.
- Image Formation- A real, inverted image forms behind the centre of curvature. This image is larger than the object, signifying magnification.
5. Object at the Focus
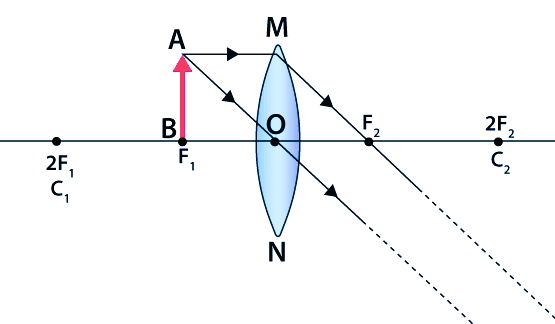
- Scenario- The object is placed at the focal point of the lens.
- Ray Behavior- The rays from the object are refracted in such a way that they become parallel after passing through the lens.
- Image Formation- Since the rays are parallel, they do not meet, and hence the image forms at infinity. This image is real, inverted, and significantly larger than the object, essentially magnified to a great extent.
6. Object Between Focus and Optical Center
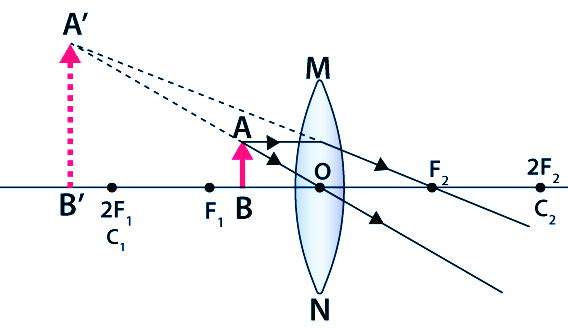
- Scenario- The object is located between the focal point and the optical centre of the lens.
- Ray Behavior- The rays after refraction appear to diverge from a point on the same side of the lens as the object.
- Image Formation- The image formed is virtual, meaning it cannot be projected on a screen. It is upright (erect) and larger than the object. This image appears on the same side of the lens as the object.
Also Check – Difference Between a Convex and Concave Lens
Drawing Ray Diagrams for Convex Lenses- A Step-by-Step Guide
Step 1- Determine Lens Parameters
- Focal Length- Identify the focal length of the convex lens. The focal length is the distance between the lens’s centre and its focus, where parallel rays converge after passing through the lens.
- Object Distance- Measure or decide the distance of the object from the lens. This distance will determine where the image is formed and its characteristics.
Step 2- Draw the Lens and Label
- Draw the Lens- Sketch a convex lens at the centre of your diagram. The lens should be drawn as a vertical line with arrowheads indicating the bulging outwards, representing the convex shape.
- Label Focal Points- Mark the focal points on either side of the lens. These are points where parallel rays converge or appear to diverge.
- Position the Object- Place the object (usually represented as an arrow) on one side of the lens at the determined distance. The tip of the arrow represents the top of the object.
Step 3- Draw the Rays
- Ray 1 (Central Ray)- Draw a ray from the top of the object straight towards the lens. This ray passes through the centre of the lens and continues in a straight line without bending.
- Ray 2 (Focal Ray)- Draw another ray from the top of the object parallel to the principal axis (horizontal line through the centre of the lens). After passing through the lens, this ray will refract and pass through the focal point on the opposite side.
- Ray 3 (Refracted Ray)- Draw the third ray from the top of the object towards the focal point on the same side as the object. Upon reaching the lens, this ray refracts and travels parallel to the principal axis.
Step 4- Locate the Image
- Convergence Point- Extend the refracted rays on the opposite side of the lens. The point where at least two of the drawn rays intersect is the top point of the image.
- Image Characteristics– Depending on where these rays intersect, you can determine the nature of the image (real or virtual), its orientation (upright or inverted), and its size (enlarged or diminished) relative to the object.
Convex lenses play a crucial role in forming images by converging light rays. Understanding the principles of convex lens ray diagrams and image formation can provide valuable insights into the fundamental concepts of optics and their applications in everyday life.
Also Check – Concave Lenses- Applications, Image Formation, and Principles
Also Check – Convex Lenses- Principles, Applications, and Insights
Also Check – Difference Between a Convex and Concave Lens
Also Check – Refraction of Light- A Comprehensive Guide for Students
Also Check – What is Light Reflection? A Simple Guide to Understanding Reflections
Also Check – Laws of Refraction- A High School Student’s Comprehensive Guide